 |
 |
The Manifold Absolute Pressure Sensor (Map Sensor) tells the ECU what the absolute pressure in the intake manifold is (relative to Absolute Vacuum). This allows the ECU to calculate the amount of air entering the engine, in order to determine how much fuel to inject. It is slightly less accurate than a Mass Air Flow system. A Maf Sensor, which directly measures the amount of air, will more directly take into consideration air density.
All Honda PGMFI systems use the Speed Density approach utilizing a Map Sensor.
Joesph Davis had this to say about the stock map sensor:
"MAP sensor: It is a 1.8 bar absolute sensor, not 1.7. It is linear for pressure:voltage, so graph it out via these two points: key on, motor off and a boost value.
Stock 1.8 bar sensor = 2.85 volts with key on engine off and 4.5xx volts at 10.6 psi. Due to physical construction, which limits MAP sensor diaphragm travel so that the full 5 volt referrence voltage return is never acheived, you never read past 9.25 psi OBD0 and 10.65 psi OBD1 ."
Map Sensor Equation
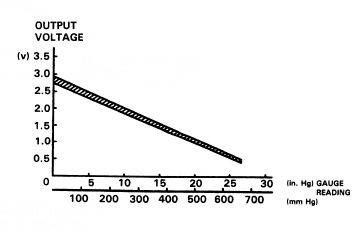
GM 2Bar, 2.25Bar and 3Bar MAP sensors can all be calibrated/graphed in a similar manner - measure voltage with key on but engine off (~= 14.5psi Absolute Pressure - one atmosphere) and then measure voltage at a known boost level, calculate slope and plot!
GM 3bar sensors read ~1.6volts key on / motor off.
GM Map Sensor Identification
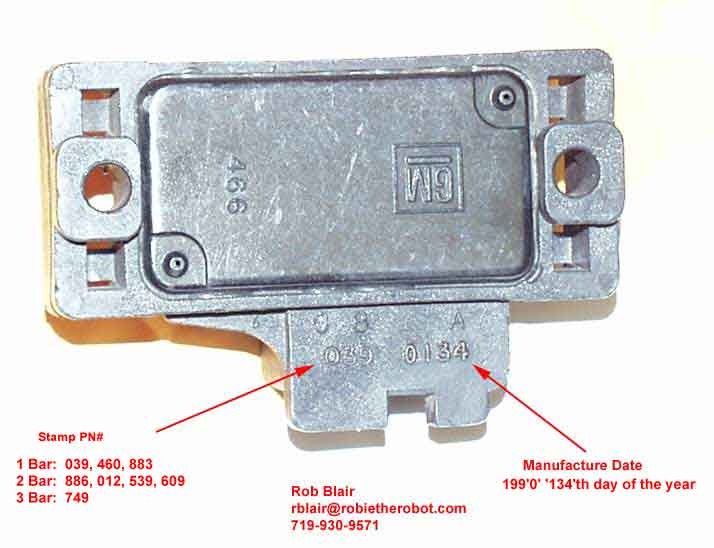 this picture has been taken from:
http://www.robietherobot.com/storm/mapsensor.htm
this picture has been taken from:
http://www.robietherobot.com/storm/mapsensor.htm
Wiring a GM MAP sensor:
| Signal | Honda | GM |
|---|
| +5V | Yellow/Red | C |
| Ground | Green | A |
| Signal | White | B |
From info provided by Xenocron:
2.5 Bar Motorola MAP Sensor Installation
Directions:
Connect Pin 1 (Vout) to the Reference signal in your stock MAP sensor wiring.
Connect Pin 2 (GND) to the Ground wire in your stock MAP sensor wiring.
Connect Pin 3 (Vs) to the 5v signal wire in your stock MAP sensor wiring.
Connect the vacuum hose from your stock map to the sensor nipple.
Make sure to either wrap securely with electrical tape or use shrink wrap to protect all pins upon installation in the engine bay. Find a secure location to mount the new MAP sensor.
Tips:
-Its not necessary for you to cut off your stock map connector, splice into the wires just before they go into the connector so that you can use it if you ever need to revert back to a stock MAP.
-Use a DVOM (Digital Volt & Ohm Meter) to determine which wires of the MAP sensor wiring are 5v, GND and Reference by turning the key in your car to ON (engine not started) and probe with the DVOM.
-Refer to the PGMFI thread for further developments for OBD0 and additional MAP sensor BIN files that will work with this sensor.
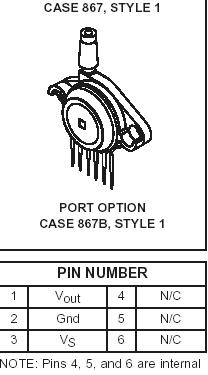 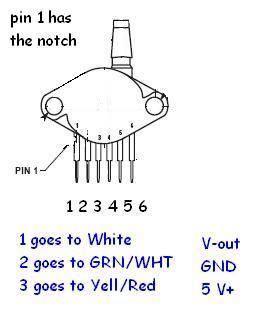 NOTE: Pins 4, 5, and 6 are internal
device connections. Do not connect
to external circuitry or ground. Pin 1
is noted by the notch in the lead. For instalation ease, you can go ahead and cut the 4, 5,6 pins off, so they dont touch anything.
Digikey part number for the sensor is: MPX4250AP-ND
For the pigtail conector on the 2.5 BAR Digi-Key Part Number A19034-ND
NOTE: Pins 4, 5, and 6 are internal
device connections. Do not connect
to external circuitry or ground. Pin 1
is noted by the notch in the lead. For instalation ease, you can go ahead and cut the 4, 5,6 pins off, so they dont touch anything.
Digikey part number for the sensor is: MPX4250AP-ND
For the pigtail conector on the 2.5 BAR Digi-Key Part Number A19034-ND
|
Copyright © 2002-present by the contributing authors. All material on this collaboration platform is the property of the
contributing authors, and is covered by the Non-Commercial Share-Alike License unless explicitly stated otherwise. |
|