How To: Reprogam your 90-91 Honda Civic or CRX
With a little bit of patience and some soldering skills, you can easily reprogram your 90-91 Multi-Point Fuel Injection (MPFI) Honda Civic or CRX, and possibly other cars as well. You may wonder “Why on earth would I want to do that?”, to which I would reply that you would gain complete control over how your car performs and consumes gas. Admittedly, there is much more to it than just clicking some buttons to give your car more horsepower or better gas mileage. With this How-To you should gain the ability to adjust your fuel and timing maps, which will bring you a step closer to understanding the computer’s role in modern automobiles.
The general idea here is that we will first determine whether your car is capable of being reprogrammed. After this step, I will explain how you can remove the factory EPROM that contains the entire block of code your car runs. Finally, I will explain, in brief, how a few open source tools will allow you to make educated changes to this code. Even if your car does not fit the criteria, it still may be possible to perform a similar operation on your factory ECU(see notes #2).
First up, a parts list:
- 25 watt soldering iron from Radioshack
- a socket wrench with 10mm socket and 2 inch extension
- a phillips head screw driver
- Lots and lots of desoldering braid, also found at Radioshack
- Very tiny lead clippers with sharp pointed tips. These are for cutting out the old chip
- very thin rosin core solder
- Needle nose pliers
- A 28 pin DIP socket
- A 28 pin low profile ZIF socket
- An Atmel AT29C256, AT29C512, or SST 27sf512 EEPROM
- An EEPROM burner, I recommend the http://www.moates.net “BURN1” or any of various Ebay specials, my personnal favorite being the Willem series of open source EEPROM burners.
- A pair of the highest magnification reading glasses you can find, the cheaper the better.
- Lastly, Honda chip kits can also be found on the internet here and here, which generally include the DIP and ZIF sockets listed above, as well as the EEPROM chip that is right for the job, and a datalogging header (Highly Recommended). Most are actually made for OBD-1 Honda’s but they will work on Pre-OBD Honda’s as well.
To find out if your car can be reprogrammed, you first have to find out if your Engine Control Unit (ECU) contains an internal or external Electronically Programmable Read-Only Memory (EPROM) unit. The Pre-OBD Honda’s equipped with EPROM ECU’s show up in 89-91 model year Civic’s and CRX’s, but are most likely found in the later years, 90 and 91. Here is how you can tell.
- First, if your car is an automatic, chipping your ECU will not work easily. See (Notes #3). If your car is a manual, proceed to the next step.
- Pop your hood. If , up by your windshield, you see the intake manifold on the LEFT, then proceed to the next step. If not, see (Notes #1) below.
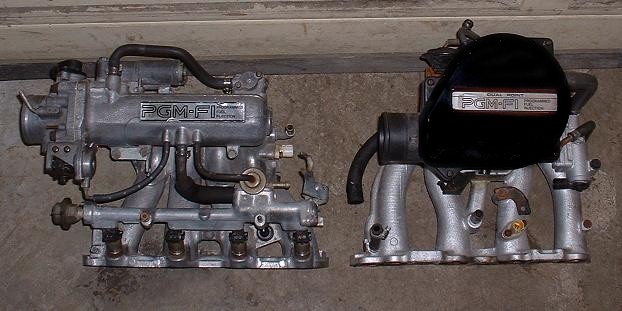
- If you see the intake manifold on the left, then you should proceed to remove your ECU to find out if your ecu is a good candidate for chipping.
- To remove your ECU, you must pull back the carpeting on the passenger side foot well. you will find a large metal plate with 4x 10mm bolts. remove those bolts and the plate.
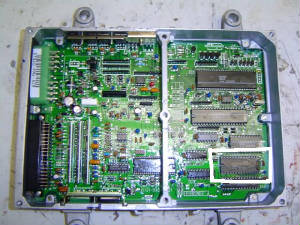
- With the plate removed, you should be able to see the ECU with the wiring attached, as seen below. Along one of the edges, usually the bottom edge, there will be a label.

- The letter substring on the label we are looking for is PM6. If you have made it this far, there is only one more step in determining whether or not your ECU is reprogrammable.
- If your ecu has PM6 on the label, unplug it and remove it from the car. see (Notes 2) For your official warning.
I must warn you that modifying an ECU is not for novice electronics or automobile enthusiast. Improperly modifying your ECU can cause catastrophic engine or component damage, engine or component failure, and/or physical injury and possible loss of life. It is very important that you understand what you are doing. If you have never done such a procedure, or don’t have much in the way of electronics or engine management experience, I suggest you visit http://forum.pgmfi.org or http://www.honda-tech.com and read for at least a week on the subject before attempting ANY modification to your car. http://mycomputerninja.com and its owner cannot be liable for any damages caused as a result of following this tutorial, whether correctly or incorrectly.
Without further adieu, we proceed with identification.
- First you must remove the lid. It is the side with the circular peephole. There should be 4 screws that need to be removed.
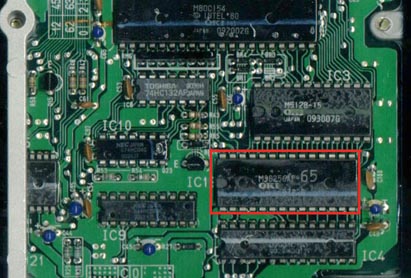
- With the lid removed, look for an EPROM chip in the bottom right, “rectangled” below.
- If your car is an 88-89, it most likely has an internal (to the processor) eprom, and is not as easily reprogrammed. You can stop here if the chip in the rectangle is not there. Proceed if it is.
At this point, we have identified that your ECU is an external EPROM ECU. Our next step is to remove that chip. To do this, you must have your soldering iron, desoldering braid, lead clippers, and reading glasses ready.
To remove the chip, start by cutting the leads on the chip, as close to the chip as possible. It is very important to cut the leads and not twist them. Twisting can cause the contacts on the circuit board to get pulled away, which is a “Bad Time”. Once you have all the leads cut, the chip should be removed from the circuit board. this should leave you with 28 sharp little leads on the circuit board, but no chip. The chip that needs to be removed is pictured below.
The next step is to use the soldering iron to desolder the pins on the circuit board. First you must remove the bottom cover of the ECU. Then use the needle nose pliers to grab the pin on the top of the circuit board, and heat up the pins on the bottom of the circuit board, all while gently pulling the pin with the pliers. This will allow the pins to be removed with little difficulty. After you have removed all 28 leads, you may proceed to the next step.
We must now test fit the DIP socket. Do this by attempting to insert the socket into the top of the circuit board. If the socket simply drops in, you are ready to move to the next step. If the socket does not drop in, which it most likely will not, then you must attempt to identify which holes are not fully desoldered, and use the desoldering braid to remove excess solder. Test fit the DIP socket every few minutes until it drops in with no resistance. then proceed to the next step.
In this step, we must resolder the 28 pin DIP socket. The easiest way to do this is to put a chunk of foam or a balled up sock under the socket to hold it in place. Then solder the socket in from the bottom using the very fine solder. Once you solder the first pin, you can remove whatever you chose to hold in the chip. All the leads must be soldered, and none of them can touch. If they do touch, use the desoldering braid to remove the excess, and be certain there is no possible way any of the contacts could be touching. This step is critical, because if done wrong, your ECU could short out on first power up. Don’t forget to use the reading glasses to make sure the leads don’t touch.
Once you have the DIP socket soldered in, with all leads not touching, you have finished the hardest part. If you want to install the datalog header (Highly Recommended!!) from the chipkit, now would be the time to do it. Websites like www.moates.net have a datalogging header installation tutorial that you can follow.
Next, you can install the bottom cover. The hardest part is officially over. Next, install the low profile ZIF socket into the DIP socket, orientation does not matter. It is mostly software from here on out.
In order to program the ECU, you will need a free Pre-OBD ecu tuning application called Turbo-Edit. Some of the links below may require you to create a user account at pgmfi.org. It is worth it if you need help and to read, so creating an account is a good idea. Turbo-Edit can be found on http://forum.pgmfi.org in the Open Turbo-Edit / Open ECU-Control thread there. Download and install it. Next you must find a stock binary for your PM6 Computer, which can be found at http://xenocron.com in the Turbo Edit bin repository. Look for the Stock_PM6.bin file. You also need to download the NG-60 binary for Turbo-Edit, which can be found on http://forum.pgmfi.org in the Open Turbo-Edit / Open ECU-Control thread area as well. Turbo edit generally requires a password to install, and that password is pgmfi.or, so that you dont forget where the software came from.
Once you have the 3 software elements, you can open Turbo-Edit and open the Stock-PM6.bin file. Then you must go to the Tools menu and select Map Import/Export. Then select export maps and export the stock PM6 code to wherever you want. Just remember this location because we will need it in a minute.
Next, you must close Turbo-Edit and re-open it, and this time, open the NG-60.bin file. Once again, go to tools, and Map Import/Export, but this time select import, and select the PM6 export you just made. Hit the ok button to complete the import. At this point, you now have a completly stock map imported into the NG-60 codebase. This gives you many new features found under the File, Properties menu, including removal of the speed limiter, increase or decrease of the redline, Launch control for drag racing, VTEC control for SOHC VTEC heads, injector multipliers, boost tools, MAP sensor scaling, and lots of other interesting tuning tools, all for free. You can also see that the tables of data contain Injector pulse width timings, and the Ignition tables contain data to control when your spark plugs fire. All of this can be used with a data acquisition system, such as the open source NG-60 compatible Ecu-Control datalogger to inform you of different engine parameters. At this point, it is very bad to change any fuel or ignition settings without a datalogger, so for the sake of this tutorial, it is only ok to have set up launch control, and changed your rev limit (within reason), and/or removed your speed limiter. All other changes are considered unsafe, unless you know what you are doing. Save the new binary under a different name that the original.
Now you should burn that new binary we just created in the previous step to a chip. Use the guidelines that came with your device to write the new binary to the chip. There are a few tutorials floating around the web, so check one out that is specific to your device. I will be creating eprom programming tutorials as a follow up to this post, so come back often. Once the eprom is programmed, proceed to the next step.
At this point, we are at final installation and/or tuning of the car. If you have datalogging built in (more on that later), and a wide-band o2 sensor (very important!) you can now tune your car to your liking. You install the chip with the half moon facing toward the center, replace the cover of the ECU, and install it back into your car.
In Future posts, I will comment on how to get your new setup to datalog factory information, and also create a basic tutorial on tuning your engine for performance (or gas mileage!!).
NOTES:
- You will need to perform an MPFI swap in order to make chipping your ECU possible. These swaps are pretty complex in terms of wiring, and are not for the feint of heart. Go here if you want to learn more.
- Mycomputerninja.com and its owner cannot be held liable for damage to your engine, your car, or yourself, as a result of this tutorial. modifying an ECU is not for novice electronics enthusiasts. Improperly modifying your ECU can cause catastrophic engine or component damage, engine or component failure, and/or physical injury and possible loss of life. It is very important that you understand what you are doing. If you have never done such a procedure, or don’t have much in the way of electronics or engine management experience, I suggest you visit http://forum.pgmfi.org or http://www.honda-tech.com and read for at least a week on the subject before attempting ANY modification to your car. mycomputerninja.com and its owner cannot be liable for any damages caused as a result of following this tutorial, whether correctly or incorrectly. This tutorial was created and intended for a 90 or 91 external eprom Honda Civic or CRX. It is not meant as a general car ECU reprogramming document.
- If your car is an automatic, you can do a automatic to manual conversion. for information on that, go here.